Using NetApp E-Series Volume Copy
- What is a volume created by Volume Copy operation
- How does it work?
- Progress
- Reserve size
- Reserve location
- Priority
- Automating Volume Copy
- Application-aware snapshots
- Consistency groups
- Online vs. offline Volume Copy
- Comparison with snapshot-based clones
- Monitoring and logging
- Conclusion
- Appendix A - Volume Copy API
What is a volume created by Volume Copy operation
It's an independent copy of a LUN.
Example:
- Source: volume data01 on Volume Group 1 (RAID6 (8D2P) made of 10 disk drives)
- Destination: clone of data01 on Volume Group 2 (RAID5 (8D1P) made of 9 disk drives)
Use cases:
- Test copy of your data - clone a volume for testing
- Local DR copies - nightly full copy of your VMware data store on a volume group not visible to VMware hosts
How does it work?
Volume Copy wizard asks you what volume you want to copy and where.
As per the example above, we pick data01 from VG1 as our Source, and pick VG2 (now without any volumes) as our Destination.
We also decide the size and location of the hidden "Reserve" volume:
- Size: the default reserve size is 40% of the Source volume, which is very generous. Use 40% unless you're short on capacity
- Location: Reserve volume can be placed anywhere - e.g. on VG1 or VG2
Another decision - which can be modified on the fly at a later time - is about job priority. Use a lower priority setting if the array and source VG are busy and a higher if they're idle.
This drawing shows a mix of the two use cases above:
- Production environment for virtual infrastructure with data01 on VG1
- Copy of data01 for test environment is made on VG2 and Reserve (
r) is also on VG2
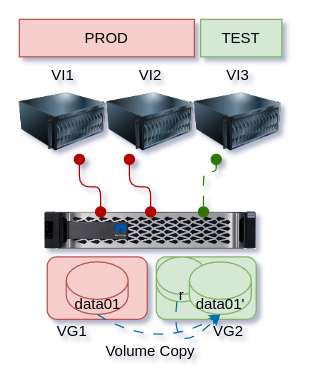
The Reserve volume ("r") is located on VG2 (more on that below).
Progress
Volume Copy progress may be observed from the Web UI.

Based on overall array situation and progress indicator, you can decide to change job priority.
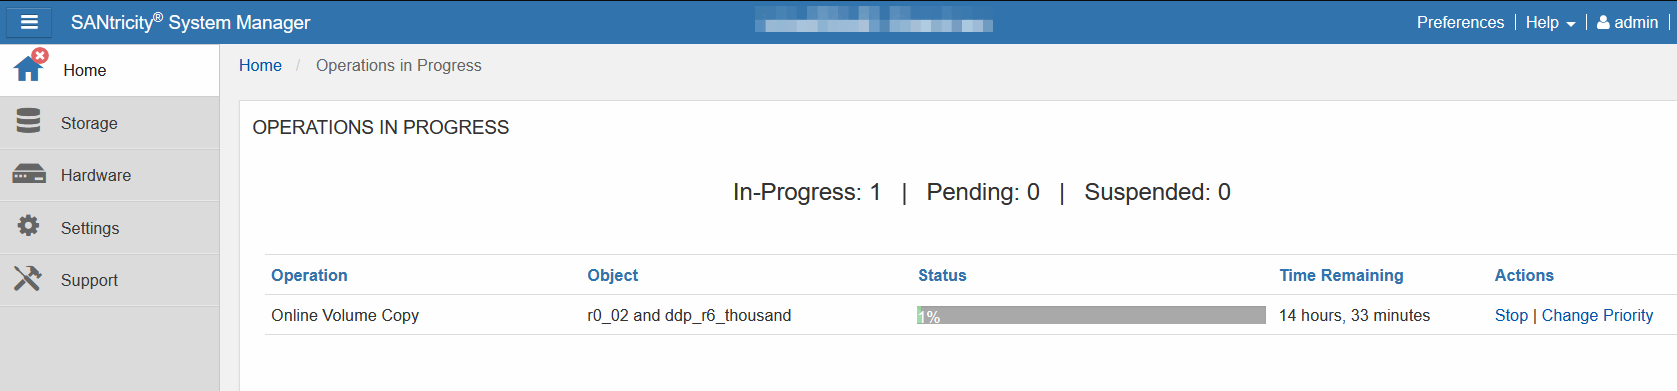
Once a job finishes, don't "Clear" it in the Web UI unless you want to delete the pairing relationship (i.e. the next time you want to copy the same Source to the same Destination, you'd have to re-run the wizard) if you want to run the same operation again without re-running Volume Copy configuration wizard.
Reserve size
This is the second step of Volume Copy wizard in the SANtricity Web UI.
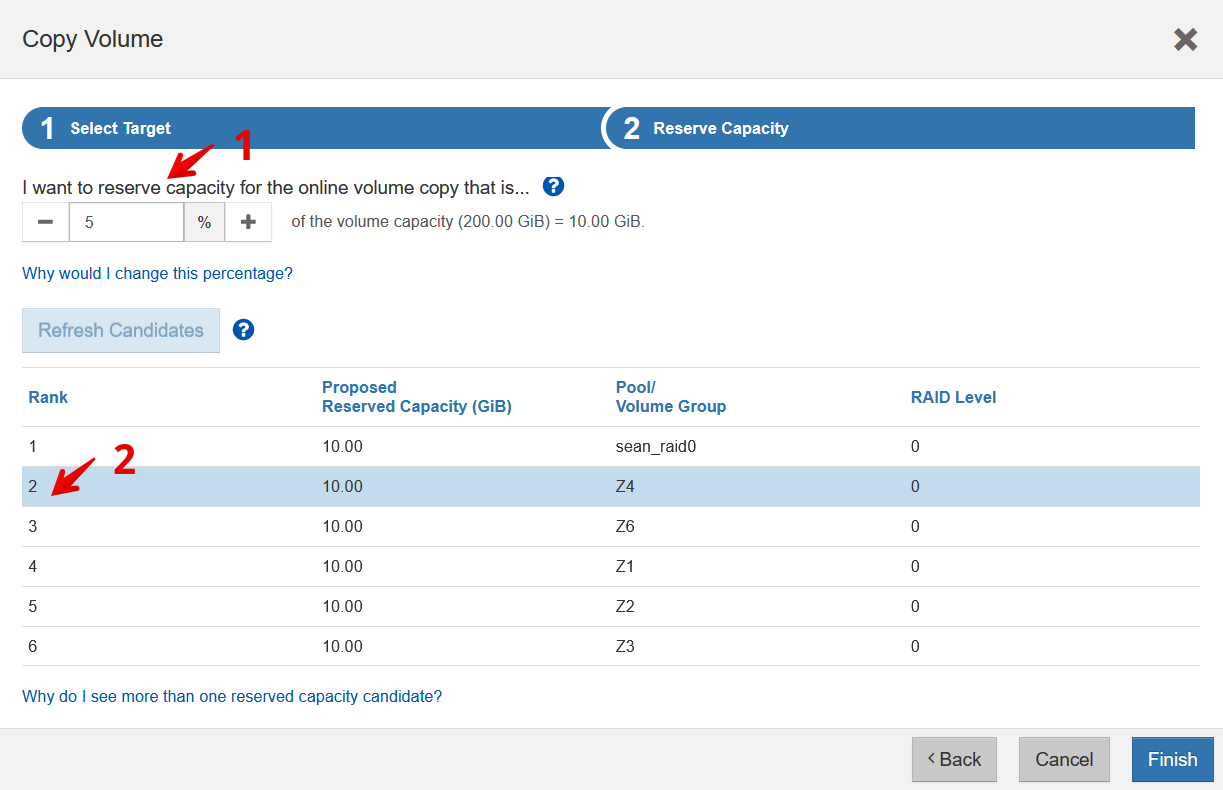
I've selected to place Reserve on the Destination VG and choose a smaller value (5%) because it's a small volume that will be copied quickly.
As I've mentioned, 40% is a lot. The purpose of Reserve volume is to hold changes to the Source volume while Volume Copy job is executing.
These "changes" are made on the Source volume, of course, but existing data (from the point-in-time we kicked off Volume Copy process) are evacuated and copied from the Source volume to Reserve so that Volume Copy can find all Source volume data as it was when copying started.
That is why the diagram above shows two copy processes:
- From Source to Destination for data unchanged since Volume Copy started
- From Reserve to Destination for data changed on Source (and evacuated to Reserve via CoW) after Volume Copy started
Priority setting:
- If Source volume is huge, Volume Copy priority low, array busy and so on, it can take 1-2 weeks to copy it. That's why Reserve is so large.
- If Source volume is small, Volume Copy priority maximum and array idle, it may take mere minutes. In this case a tiny reserve (5%) should be enough.
If you're very short on available space (for Reserve), you may be able to perform offline Volume Copy. You'd have to stop IO to the Source Volume(s) during that time, though.
Reserve location
There are no particular concerns about reserve volume location. Once copy is done:
- If relationship is cleared (deleted), Reserve is removed
- If relationship is left in place, Reserve is emptied but remains there for next run of Volume Copy
If Reserve volume gets lost, Volume Copy would likely fail and need to be re-tried.
The diagram above shows the temporary reserve volume on the same VG as the destination/clone volume (data01').
Priority
This is easy.
There are 5 priority levels: 0 - lowest, 4 - highest.
Say you have an array that's mostly used during office hours, and during the night you want to use Volume Copy to make copies of five 2 TB volumes.
In this case you should be able to use the highest priority (4). Watch array logs to see when these finished and adjust if necessary.
This shows an idle EF570 copying a volume at the highest priority - CPU utilization (presumably on the owning controller) jumped some 10%. (When array is idle, CPU utilizatio is still around 40%.)

In other words, there's no harm in running half a dozen on those at the highest priority as long as they can finish by 6-7 am.
Job priority can be changed while a job is running and fiddling with it should reflect immediately in time-to-completion indicators you can see in the Web UI or API. If you're concerned about the impact you cn start with a lower priority and increase it as you watch job progress indicator and array performance.
Note that the lowest priority seems like a no-brainer, but it is very slow. The reason isn't that E-Series is slow, but that it copies data so that there's almost no impact on array performance. Even if your array is doing nothing else, this will be very slow because even opportunistic low-priority acceleration is not used in this case.
Automating Volume Copy
You can use SMCli, or the API.
Before we start looking at those choices, notice that a pair can be created in the SANtricity Web UI and once it's created, it's available for automation. I found that easier to deal with, as long as all admins know they mustn't "clear" Volume Copy pairings (i.e. unpair the volumes) in the Web UI.
Once the pairs are available, you can simply start (and stop, although you probably wouldn't use this much) copying.
SMCli seems to disallow less than 20% reserve size. Some examples:
smcli create volumeCopy source=${SOURCE_NAME} target=${TARGET_NAME} ...
smcli show volumeCopy allVolumes
Using the SANtricity API, I'd create pairs in the Web UI and then just start/stop and monitor via the API:
- POST to "volume-copy-jobs-control" is used to start/stop jobs by their Volume Copy job ID.
- GET to the same path is used to get percentComplete and estimated timeToCompletion
As you start jobs, make sure that call returns success because if another admin has deleted the pair ID that call will fail and SANtricity will log an error in MEL (log).
If we handle error responses we can send notifications to Slack, Splunk, etc. There are posts on E-Series monitoring and logging (see Archives).
Application-aware snapshots
You would have to offline Source volume for that, or synchronize the suspension of IO on host(s) with the start of Volume Copy operation.
Another way is to take an application consistent snapshot and then start volume copy, and on the clone first revert to the last snapshot.
Consistency groups
SANtricity has "Consistency Group snapshots". Read about them here.
There's no "Group Volume Copy" that would do the same thing.
You'd have to offline (or disconnect from) Source volumes and start multiple copy jobs for that. After jobs have been started, you could online your primary workload (because change delta would be Copy-on-Write-d to Reserve volumes).
Online vs. offline Volume Copy
From TFM:
- Offline copy: An offline copy reads data from the source volume and copies it to a target volume, while suspending all updates to the source volume with the copy in progress.
- Online copy: An online copy creates a point-in-time copy of any volume within a storage array, while it is still possible to write to the volume with the copy in progress.
In other words, you normally want an online copy. For offline, you'd have to stop the application(s) and disk IO for as long as copying lasts, but you'd be able to avoid having a Reserve.
Comparison with snapshot-based clones
How does this differ from SANtricity clones created from volume snapshots?
Those share the same base, so if you wipe the source, everything goes (snapshots, clones).
Clones created with Volume Copy are on physically separate volumes, without active references. Wiping out a Source does not wipe the clone.
Monitoring and logging
I mentioned earlier posts on SNMP and such, where you can find how to monitor these in 3rd party systems or services.
There's also E-Series Performance Analyzer (EPA) which could be modified to send progress metrics for various Volume Copy job IDs. I haven't heard of users using Volume Copy so I haven't considered adding those metrics it to EPA, but if you need them create an issue in the EPA repository on Github (or submit your pull request).
Conclusion
Volume Copy feature creates clones that are located on independent volumes (and optionally, physically separate volume groups). Data on such clones is safe from accidental or deliberate deletion from hosts. They can also survive volume group failures if copy is made on a different volume group.
On Hybrid arrays Destination can be located on a lower-cost volume group (e.g. R5 instead of R6 or R10 used for Source, or NL-SAS HDD instead of SAS SSD). Remember that as of now, Source and Target must have identical sector settings (512b-to-512b, 512e-to-512e, 4096-to-4096), so currently you can copy SAS SSD to NL-SAS SSD, but not NVMe to/from (any) SAS disks (SSD or NL-SAS) until this limitation is removed.
The automation is also relatively easy, especially if use Volume Copy wizard to create pairs from the SANtricity Web UI.
Appendix A - Volume Copy API
I'll assume you setup and delete relationships using in the Web UI.
What's left is GET pairing info, start/stop job ID, and GET progress.
Get Volume Copy pairing relationship information
For relationship 18000000600A098000E3C1B0000033CF66FFF329:
curl -X GET "https://C1/devmgr/v2/storage-systems/1/volume-copy-jobs/18000000600A098000E3C1B0000033CF66FFF329" \
-H  "accept: application/json"
Response:
{
  "worldWideName": "600A098000E3C1B0000033CF66FFF329",
  "volcopyHandle": 49170,
  "volcopyRef": "18000000600A098000E3C1B0000033CF66FFF329",
  "status": "complete",
  "sourceVolume": "35000000600A098000E3C1B0000033CE66FFF329",
  "targetVolume": "02000000600A098000F637140000308466FFF5DA",
  "currentManager": "070000000000000000000002",
  "idleTargetWriteProt": false,
  "copyCompleteTime": "1728073083",
  "copyStartTime": "1728073048",
  "copyPriority": "priority4",
  "reserved1": "00000000",
  "cloneCopy": true,
  "pgRef": "33000000600A098000E3C1B0000033CA66FFF328",
  "type": "offline",
  "autoClearOnCompletion": false,
  "baseSourceVolumeId": "02000000600A098000E3C1B0000033BF66FFF11E",
  "onlineCopy": true,
  "id": "18000000600A098000E3C1B0000033CF66FFF329"
}
To avoid errors, it's good to have a list of expected pairings (e.g. job IDs such as 18000000600A098000E3C1B0000033CF66FFF329), get all pairings from the array, check if the expected one(s) is/are present, and then start each.
Volume Copy progress
Query management IP of controller 1 for job ID 18000000600A098000E3C1B0000033C766FFF1A8:
curl -X GET "https://C1/devmgr/v2/storage-systems/1/volume-copy-jobs-control/18000000600A098000E3C1B0000033C766FFF1A8" \
  -H  "accept: application/json"
Sample response if job exists (this one has been started, but hasn't moved from 0 yet):
{
  "percentComplete": 0,
  "timeToCompletion": 332,
  "fractionalPercentComplete": 0,
  "volumeCopyId": "18000000600A098000E3C1B0000033C766FFF1A8"
}
Update priority of Volume Copy job
Change priority0 (the lowest) to priority3 (second highest) with:
curl -X POST "https://C1/v2/storage-systems/1/volume-copy-jobs/18000000600A098000E3C1B0000033C766FFF1A8" \
  -H  "accept: application/json" \
  -H  "Content-Type: application/json" \
  -d "{  \"copyPriority\": \"priority3\",  \"targetWriteProtected\": true}"
Response:
{
  "worldWideName": "600A098000E3C1B0000033C766FFF1A8",
  "volcopyHandle": 49170,
  "volcopyRef": "18000000600A098000E3C1B0000033C766FFF1A8",
  "status": "inProgress",
  "sourceVolume": "35000000600A098000E3C1B0000033C666FFF1A8",
  "targetVolume": "02000000600A098000F637140000308466FFF5DA",
  "currentManager": "070000000000000000000002",
  "idleTargetWriteProt": true,
  "copyCompleteTime": "0",
  "copyStartTime": "1728072662",
  "copyPriority": "priority3",
  "reserved1": "00000000",
  "cloneCopy": true,
  "pgRef": "33000000600A098000E3C1B0000033C266FFF1A7",
  "type": "offline",
  "autoClearOnCompletion": false,
  "baseSourceVolumeId": "02000000600A098000E3C1B0000033BF66FFF11E",
  "onlineCopy": true,
  "id": "18000000600A098000E3C1B0000033C766FFF1A8"
}
If you want to be smart you could modify this dynamically based on overall array performance stats:
- if controller utilization less than x% and IOPS less than Y and MB/s less than Z:
- increase priority by 1 if not already at level 4
- elseif (if greater than some values)
- decrease priority by 1 if not already at level 1
- else leave as is
Delete Volume Copy job (pairing)
You wouldn't want to do this if you do it in the Web UI, but you could stop (if it's running) a job and delete its pairing.
curl -X DELETE "https://C1/devmgr/v2/storage-systems/1/volume-copy-jobs/18000000600A098000E3C1B0000033C766FFF1A8?retainRepositories=false" \
  -H  "accept: application/json"
I mention this because you can delete a pairing relationship but retain the reserve repository and potentially reuse it later, assuming you remember its details.
I haven't played with this in the API, so I don't know what happens if you delete a job but leave the repository in place and forget about it. This is another reason why I suggest that jobs be created and deleted in the Web UI unless you figure out the exact details of these API methods and not shoot yourself in the foot automating those steps.
Create Volume Copy job (pairing)
This illustrates why
curl -X POST "https://C1/storage-systems/{system-id}/volume-copy-jobs -d "${JSON}"
POST-ed JSON can be very complex, but
{
  "sourceId": "string",
  "targetId": "string",
  "copyPriority": "priority2",
  "targetWriteProtected": false,
  "onlineCopy": false,
  "repositoryCandidate": {
    "candType": "unknown",
    "newVolCandidate": {
      "memberVolumeLabel": "string",
      "memberVolumeGroupLabel": "string",
      "memberCandidate": {
        "raidLevel": "raidUnsupported",
        "trayLossProtection": true,
        "rawSize": "string",
        "usableSize": "string",
        "driveCount": 0,
        "freeExtentRef": "string",
        "driveRefList": {
          "driveRef": [
            "string"
          ]
        },
        "candidateSelectionType": "freeExtent",
        "spindleSpeedMatch": true,
        "spindleSpeed": 0,
        "phyDriveType": "all",
        "dssPreallocEnabled": true,
        "securityType": "unknown",
        "drawerLossProtection": true,
        "driveMediaType": "all",
        "protectionInformationCapable": true,
        "protectionInformationCapabilities": {
          "protectionInformationCapable": true,
          "protectionType": "type0Protection"
        },
        "volumeCandidateData": {
          "type": "unknown",
          "diskPoolVolumeCandidateData": {
            "reconstructionReservedDriveCount": 0,
            "reconstructionReservedAmt": "string",
            "unusableCapacity": "string"
          }
        },
        "driveBlockFormat": "unknown",
        "allocateReservedSpace": true,
        "securityLevel": "unknown",
        "dulbeCapable": true,
        "blkSizeRecommended": 0,
        "blkSizeSupported": [
          0
        ],
        "volumeGroupRef": "string",
        "drivePathImbalance": true
      },
      "memberCapacity": "string"
    },
    "existVolCandidate": {
      "refType": "unknown",
      "memberVolumeRef": [
        "string"
      ],
      "memberLabel": [
        "string"
      ]
    },
    "expansionDescriptor": {
      "additionalCapacity": "string"
    }
  }
}