Using NetApp Cloud Sync API
NOTICE: all credentials and tokens on this page are samples, not leaked.
- Start using Cloud Sync
- Deploy Data Broker
- Set up a relationship and subscribe to Cloud Sync service
- Sync
- Reports
- Unsubscribe
- Conclusion
This post is the second in a two-post series. The first post can be found here and in it you can find how to auth and connect to the Cloud Sync API endpoint. Please note that various IDs have been changed or are results of different experiments, so IDs in JSON examples may be inconsistent.
Start using Cloud Sync
We need to install Cloud Sync Data Broker on Linux. This takes minutes. It needs to be able to access both Source and Destination.
In this post I'll replicate data from a local NFS server (LAN) to a StorageGRID bucket (WAN), so I will deploy Data Broker on LAN in order to have NFS client close to the source.
Deploy Data Broker
To deploy one via the API you need to have a list of Data Broker groups. We get that with GET /groups. A butchered version of a longer JSON response can be seen below:
[
    {
        "dataBrokers": [
            {
                "name": "data-borker",
                "type": "ONPREM",
                "groupId": "6100000000000000000000003",
            }
        ],
        "relationships": [],
        "createdAt": "2022-01-18T02:50:31.605Z",
        "id": "6000000000000000003"
    }
]
Once we have groupId, we use POST /data-brokers to create a new Data Broker. What exactly goes in there is a mystery. This is what I tried:
{
    "name": "data-borker-2",
    "type": "ONPREM",
    "groupId": "6000000000000000003"
}
There's a port param which I haven't been able to figure out and this didn't work with or without it: in both cases I'd get "Data broker cant (sic!) be added to a group with listener data broker".
But I created the first Data Broker from the Web UI and that was very easy and intuitive. I named it "data-borker" and used GET /data-brokers to see what properties it has (there's no "port" among them, though).
[
    {
        "name": "data-borker",
        "type": "ONPREM",
        "groupId": "60000000000000003",
        "tasksQueueUrl": "https://sqs.us-east-1.amazonaws.com/16666666666666/TASKS_prod",
        "createdAt": 1642474246365,
        "lastPing": 1642478517750,
        "transferRate": 210.79297356754773,
        "placement": {
            "updateConfiguration": true,
            "distribution": "Ubuntu 20.04.3 LTS",
            "privateIp": "192.168.1.112",
            "updateNewVersion": true,
            "hostname": "vm-db",
            "platform": "linux",
            "os": "Linux",
            "release": "5.4.0-58-generic",
            "osTotalMem": "16792068096",
            "node": "14.18.2",
            "cpus": "2",
            "processMaxMem": "117792768",
            "scanner": {
                "concurrency": 50,
                "processes": 2,
                "processesLimit": 10
            },
            "transferrer": {
                "concurrency": 50,
                "processes": 2,
                "processesLimit": 10
            },
            "version": "1.0.26.21053-379595f-production",
            "vault": "1.8.4"
        },
        "id": "61a1a1a1a1a1a1a1a1a1a1a1a",
        "status": "COMPLETE",
        "fileLink": "https://cf.cloudsync.netapp.com/32f0516-b6fd-3719-c8129-3faef96d114_installer",
        "latestVersion": "1.0.26.21053-379595f-production"
    }
]
Set up a relationship and subscribe to Cloud Sync service
We may subscribe to Cloud Sync before or after a relationship has been configured. If you pay by hour, you can do it after ("just-in-time").
Then we can setup a relationship according to our plan at the very top of this post.

We can choose to subscribe to Cloud Sync using Amazon Marketplace (or Azure), upload a bulk subscription license purchased from NetApp. I chose the former because the bulk license supports 20 relationships which isn't necessary for this post.
POST /relationships-v2 can be used to create a relationship. This requires a ton of info so rather than waste time here, I suggest to create one in the Web UI and then GET /relationships-v2 it to see what goes in.
It's self-explaining if you do it yourself in the Web UI, so I'll only highlight several key points for those of you who don't have time to do that:
- I sync NFS export 192.168.1.3/data/s3/fake/bake to StorageGRID S3 bucket /fake
tagsis something you can add to help you find this relationship- Comparison is always done by at least name and size, but additionally we can enable mtime and other properties
- I chose to have Cloud Sync sync data according to a schedule set in
schedule(every Tuesday 10pm local time which is 2pm UTC). Of course, this wouldn't always be 10pm for those whose TZ's offset changes from time to time, but when you use the browser Cloud Sync lets you pick local time - There are other options that are present in JSON but in fact Cloud Sync defaults so you probably can get away with a shorter configuration JSON
[
    {
        "account": "44444444444444444444444",
        "dataBroker": "61a1a1a1a1a1a1a1a1a1a1a6",
        "source": {
            "protocol": "nfs",
            "nfs": {
                "host": "192.168.1.3",
                "export": "/data/s3",
                "path": "fake/bake",
                "version": "3",
                "provider": "nfs"
            }
        },
        "target": {
            "protocol": "s3",
            "s3": {
                "provider": "sgws",
                "host": "storagegrid.netapp.com",
                "port": "443",
                "bucket": "fake",
                "prefix": "",
                "tags": [
                    {
                        "key": "app",
                        "value": "fake"
                    },
                    {
                        "key": "src",
                        "value": "nfs"
                    },
                    {
                        "key": "tgt",
                        "value": "storagegrid"
                    },
                    {
                        "key": "data",
                        "value": "logs"
                    }
                ]
            }
        },
        "settings": {
            "gracePeriod": 30,
            "deleteOnSource": false,
            "deleteOnTarget": false,
            "objectTagging": false,
            "retries": 3,
            "copyAcl": false,
            "files": {
                "excludeExtensions": [],
                "maxSize": 9007199254740991,
                "minSize": 0,
                "minDate": "1970-01-01",
                "maxDate": null,
                "minCreationDate": "1970-01-01",
                "maxCreationDate": null
            },
            "fileTypes": {
                "files": true,
                "directories": true,
                "symlinks": true
            },
            "compareBy": {
                "uid": true,
                "gid": true,
                "mode": true,
                "mtime": true
            },
            "schedule": {
                "syncInDays": 7,
                "syncInHours": 0,
                "syncInMinutes": 0,
                "nextTime": "2022-01-18T14:00:00.000Z",
                "isEnabled": true,
                "syncWhenCreated": false
            },
            "copyProperties": {
                "metadata": false,
                "tags": false
            }
        },
        "isQstack": false,
        "isCm": true,
        "phase": "Initial Copy",
        "group": "611111111111111111111111",
        "tags": [
            {
                "key": "name",
                "value": "NFS2SG"
            }
        ],
        "createdAt": 1642476996677,
        "id": "611111111111111111111111",
        "relationshipId": "611111111111111111111111",
        "activity": {
            "type": "Initial Copy",
            "status": "PENDING",
            "errors": [],
            "failureMessage": "",
            "executionTime": null,
            "endTime": "2022-01-18T04:05:49.435Z",
            "bytesMarkedForCopy": 0,
            "filesMarkedForCopy": 0,
            "dirsMarkedForCopy": 0,
            "filesCopied": 0,
            "bytesCopied": 0,
            "dirsCopied": 0,
            "filesFailed": 0,
            "bytesFailed": 0,
            "dirsFailed": 0,
            "filesMarkedForRemove": 0,
            "bytesMarkedForRemove": 0,
            "dirsMarkedForRemove": 0,
            "filesRemoved": 0,
            "bytesRemoved": 0,
            "dirsRemoved": 0,
            "bytesRemovedFailed": 0,
            "filesRemovedFailed": 0,
            "filesMarkedForIgnore": 0,
            "dirsScanned": 0,
            "filesScanned": 0,
            "dirsFailedToScan": 0,
            "bytesScanned": 0,
            "progress": 0,
            "lastMessageTime": "2022-01-18T03:36:36.676Z",
            "topFiveMostCommonRelationshipErrors": []
        }
    }
]
We'd use PUT /relationships/{id}/sync to configure a relationship.
GET /relationships-v2/ gets all the relationships, while GET /relationships-v2/:id gets you one defined by relationship ID.
Sync
I couldn't wait until 10pm but I wanted to see a report, so I manually executed a sync job.

Using the API you'd use PUT /relationships/:id/sync and provide id obtained from GET /relationships-v2.
If any of the files failed to get scanned or copied I'd see them in Copy > Failed or in a report obtained via the API.
Reports
After scheduled synchronization job is supposed to finish, we can run a report to see what happened.
To create a new report we'd use the sample from Swagger's POST /accounts/{accountId}/reports.
Report templates come with no examples and you need to be determined to find answers to questions such as what's "accessPoint", what API method to use to get Working Environment ID, and so on.
It seems GET /relationships-v2 has 90% of the inputs required, but you'd need do some extra digging to find the rest. Because of this and other reasons I decided to use the Web UI instead.
In the Web UI it's easy to create a report for both Source (here, NFS) and Destination (here, S3).
Status at Source:

Status at Destination:

All right, 51 items and 29.47 MB on each side - mission accomplished!
You could now use the API to see how those reports need to be created. Even better, now that you have reports configured, you can get a report with GET /accounts/:accountId/reports/:id a report. Use POST /accounts/:accountId/reports to create a new one and DELETE to delete the ones you no longer need.
{
    "account": "500000000000000000000000",
    "dataBroker": "699999999999999999999999",
    "endpoint": {
        "protocol": "s3",
        "s3": {
            "bucket": "fake",
            "host": "storagegrid.netapp.com",
            "port": "443",
            "prefix": "",
            "provider": "sgws"
        }
    },
    "statistics": {
        "totals": {
            "objects": 51,
            "emptyObjects": 0,
            "size": 30896494,
            "failed": 0
        },
        "errors": [],
        "distributions": {
            "modifiedTime": {
                "0hr-1hr": 51,
                "1hr-1d": 0,
                "1d-1w": 0,
                "1w-1m": 0,
                "1m-1y": 0,
                "1y+": 0
            },
            "size": {
                "0mb-1mb": 32,
                "1mb-10mb": 19,
                "10mb-100mb": 0,
                "100mb-1gb": 0,
                "1gb-10gb": 0,
                "10gb-100gb": 0,
                "100gb-1tb": 0,
                "1tb+": 0
            },
            "storageClass": {
                "STANDARD": 51,
                "REDUCED_REDUNDANCY": 0,
                "STANDARD_IA": 0,
                "ONEZONE_IA": 0,
                "INTELLIGENT_TIERING": 0,
                "GLACIER": 0,
                "GLACIER_IR": 0,
                "DEEP_ARCHIVE": 0
            }
        }
    },
    "status": "DONE",
    "startTime": "2022-01-18T04:53:09.998Z",
    "endTime": "2022-01-18T04:53:13.223Z",
    "id": "61e647b5c020161882fc6bbc",
    "duration": 3225
}
This gives us the opportunity to do something after we compare this outcome with what we had expected. If everything checks out, we can consider automating follow-up actions such as:
- shut down Data Broker if it's running in public cloud
- unsubscribe from Cloud Sync
- send email notification
Unsubscribe
If you sync once a week, you can subscribe and unsubscribe just in time. Look at the green rectangle in the screenshot above. That's when I'm subscribed.
But if I sync once a week, once I see a successful report I can unsubscribe until before next job is due.
As mentioned at the very top I used pay-as-you-go subscription for this post, so I went to AWS Marketplace to unsubscribe. It took two clicks to find and and one click to Unsubscribe.
If you check your Cloud Sync dashboard after that, you'll see a red rectangle telling you your relationship cannot be used (but that's OK, we can subscribe next week before 2pm UTC time.)
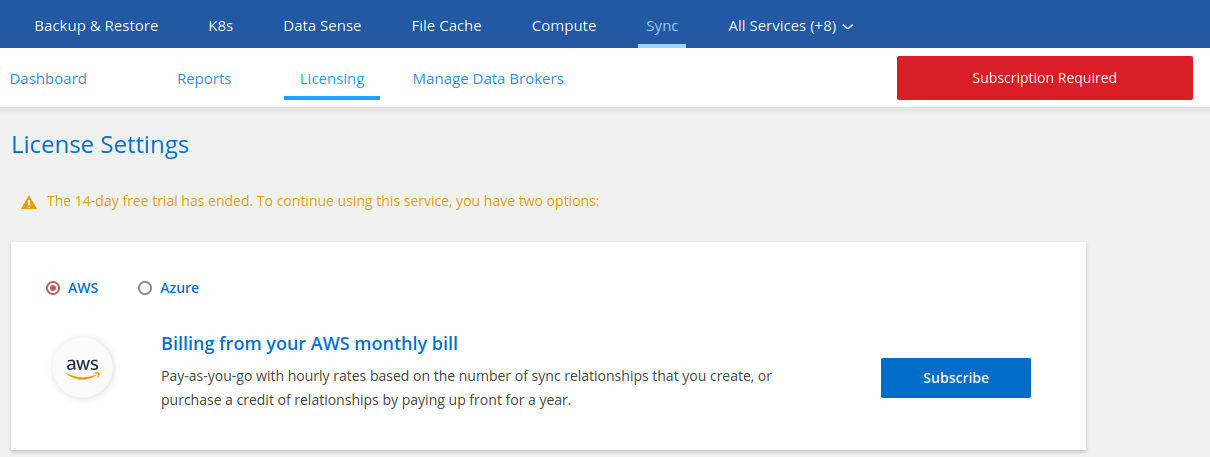
This screenshot also shows that your relationship definition remains in place. You can also leave your Data Broker running, but you can also shut it down until 10-15 minutes before next run if sync jobs aren't frequent.
There are ways to automate AWS and Azure subscriptions, but you also need to be able to access that API so please check their own documentation for more on that.
Conclusion
The Cloud Sync API lets you do everything you can do in the Web console (dashboard) and more, but it can be time-consuming to figure out what parameters and required and where to get them.
First-time users may find it easier to use The Pelosi Method ("We [need] to create a configuration in order to find out what [goes] in it"). So set things up using the Web UI and then use GET or LIST to find out how you can do that with the API.
Reports offer an easy way to compare object/file count and size, although there's no way to get a full list of all files replicated in a run (I assume that's because it could amount to gigabytes of data; not in this case, but there are Cloud Sync who sync millions of files).
For users who sync infrequently one interesting addition to Cloud Sync automation scripts would be a Cloud Sync (un)subscription function that we could run against AWS or Azure API before and after Cloud Sync jobs run.