Getting started with NetApp Cloud Sync API
NOTICE: all credentials and tokens on this page are samples, not leaked.
This post is the first in a two-post series. The second post can be found here and shows next steps (deploy Data Broker, configure a relationship, get reports, etc.).
Getting started
Struggling to get started with the NetApp Cloud Sync API? Read on.
Short answer
Long answer
Let's just say those pages aren't leading examples of great developer documentation out there.
You need complete these steps:
- Get JWT Access Token (aka Bearer Token)
- Get the exact accountId you intend to use for Cloud Sync
JWT access token (access_token) for NetApp Cloud Central
You get that using the creds you use at https://netapp-cloud-account.auth0.com/.
{
    "grant_type": "password",
    "username": "someguy@somewhere.com",
    "password": "s3kreT",
    "scope": "profile",
    "audience": "https://api.cloud.netapp.com",
    "client_id": "ABCO123...RANDOMSTUFF"
}
Where does one get client_id? This took me only 20 minutes to find out.
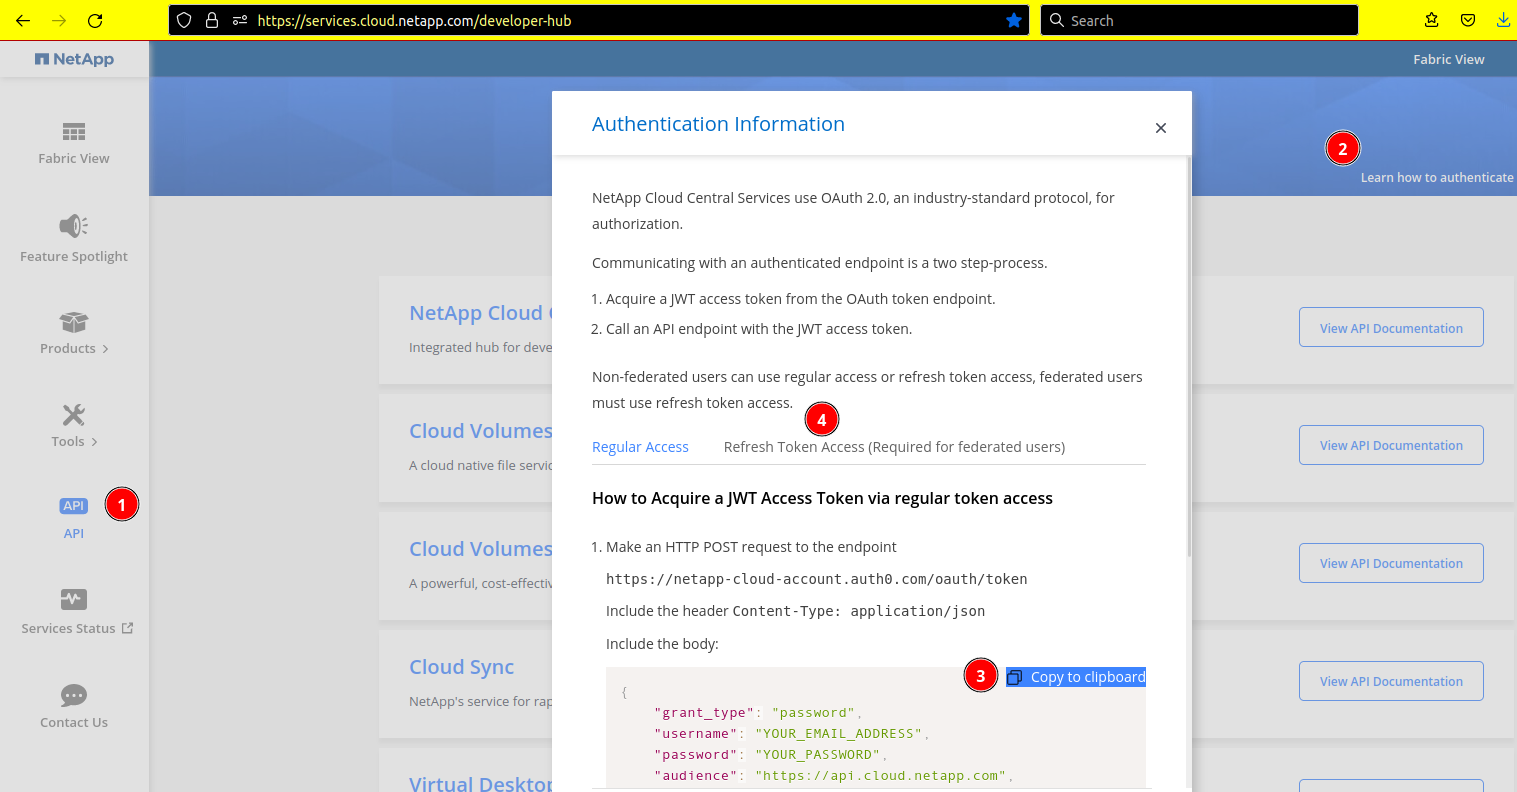
No, I don't want to "learn how to authenticate" (step (2))! I just want the stuff I need to start using the API!
But if you don't want to learn you may need to spend the next 20 minutes using search engines. Even worse, there's a video demo (which I also watched) that completely skips this step. It's so easy, you just need to be willing to learn (wink, wink). (That's a long way to say that client_id can be obtained in step (3) above, and refreshed in step (4).)
Once your BODY values are correct, send that BODY in a POST request to https://netapp-cloud-account.auth0.com/oauth/token (Header: Content-Type: application/json). The API will return your access_token.
{
    "access_token": "eyJhb.........LONG....iS0raQ",
    "scope": "profile cc:update-password",
    "expires_in": 86400,
    "token_type": "Bearer"
}
From now on this thing needs to be add to API request headers as Authorization: Bearer $TOKEN. Refresh it after (or before) it expires.
Cloud Sync Account ID from NetApp Cloud Central
The second thing we need is Account ID. Populate the header with that Bearer Token and GET /accounts.
For some reason Cloud Sync Swagger is has an incomplete URI (one can't help but wonder are there many Cloud Sync API endpoints where these requests can be sent?), so if you use that JSON in Postman you must change baseUrl to https://api.cloudsync.netapp.com/api.
Use that Bearer Token in Authorization tab, and in Headers add Content-Type and set it to application/json.
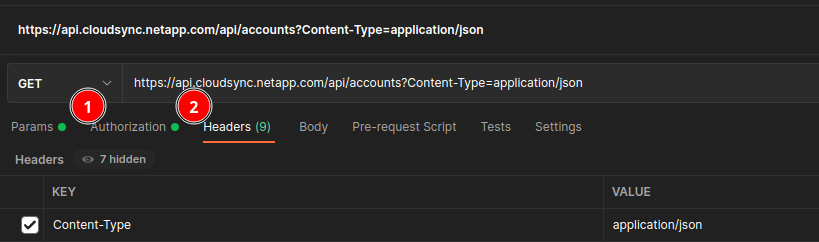
You could as well use https://api.cloudsync.netapp.com/api/accounts?Content-Type=application/json to take are of the second setting.
This will return your accountId.
[
    {
        "accountId": "account-duCK8",
        "name": "CS-duCK8"
    },
    {
        "accountId": "account-chiKun1",
        "name": "Another"
    }
]
I haven't tried to use these yet because I currently don't have a Data Broker deployed and I'm too tired in my head to continue. I assume you need to pick one of accounts tied to workspace which can access your data (Cloud Sync source and destination).
In my case "Another" is my "main" NetApp Cloud account. I have one Working Environment called CS-(something), so I suppose "CS-duCK8" is the accountId I would use to manage my Data Broker in that particular workspace. Otherwise I'd use the "main" account.
Random Swagger, Postman and REST rant
You can add Cloud Sync API definition to Postman using the Import feature. Copy the JSON body from Swagger > Raw Data.
As you import this JSON it may be helpful to try non-default import options. Otherwise Postman will helpfully insert a bunch of garbage as "example" API values and you'll have to change this in every single example.
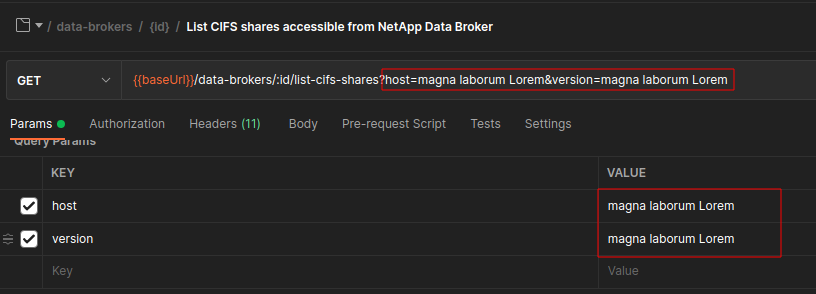
I don't get this. How on earth is something like "version: magna laborum Lorem" supposed to help me???
It'd be more helpful if it was left empty (or if examples were provided in the Swagger JSON file). Like this it's worse than useless!
And because that junk is hidden in Headers, every time you try an API method you have to read error messages like this:
{
    "code": 400,
    "message": "Account with id magna laborum Lorem is not found on tenancy for current user"
}
I know I should always check the headers, but let's assume I used non-default import option and didn't have that junk added by Postman:
{
    "code": 400,
    "message": "Multiple tenancy accounts. Could not select specific tenancy account"
}
Much better! There's less to read and it's just as easy to tell where the problem is. But by now I'm fed up with this whole thing and won't try to figure out which import option in Postman would lead to a better outcome.
One REST API annoyance unrelated to Cloud Sync or Postman I discovered while dealing with this Postman nonsense is that with multiple KV pairs in Headers you must always edit multiple fields by moving your mouse or hitting the TAB key after each KV pair, or else use Bulk Edit (Postman feature) which (a) takes two extra clicks and (b) is awkward. And if you want to add (or remove) KV pairs from Headers, it's even more clicks.
I much prefer JSON-RPC (example: SolidFire API): get the Postman file (in it, all parameters in sample JSON files are present), find your method, go to Request Body, edit JSON variable(s), hit Send.
{
    "method": "GetAccountEfficiency",
    "params": {
        "accountID": 1
        },
    "id": 1
}
Next steps
Now we can stand up a Data Broker VM and try to sync some data.